
At King Swings, all of our sets are made-to-order, allowing for customization. Customizing is always free—there’s no charge for working with our design team or for creating custom layouts. Your final price is determined by the cost of the components you choose, including slides, swings, playhouses, towers, and various color options.
Some families start with one of our standard sets and adjust the features, while others prefer to design something completely custom.
Looking for inspiration? Our Instagram showcases hundreds of custom King Swings installations in real backyards across the country, offering ideas for layouts, colors, accessories, and custom features.
This guide is designed to help you understand how each component functions on a King Swings vinyl swing set. While reviewing the guide, you'll gain a better understanding of the available features, play experiences, and design possibilities.
When it comes to determining the ideal placement of components, our complimentary one-on-one design service is here to help. You'll work directly with a King Swings Design Consultant who specializes in creating layouts that maximize play value, fit your available space, accommodate your children's ages and interests, and complement your backyard.
If you like your content in video form, here is a condensed version of the guide.
Let’s get started with three core fundamentals: your space, budget, and needs.
Space
Walk into your yard with a tape measure and take some quick measurements. I would recommend mapping out two different-sized areas: one that is 18’x24’ and another that is 25’x30’. These are common playground sizes and a great place to start when understanding how much of your yard you are willing to dedicate to your play area.
If you want information on how far each piece will stick out from the swing set tower, you can check out this blog post.
As you work with our swing set design team, you will get updated drawings with the needed play-use zones on them. You can remeasure at that point, but knowing how much space you have at the beginning helps with the initial planning.
Also, think about what parts of the swing set you want to see from your house. Do you want clear visuals on the swings? The climbers? That will help you decide on your swing set layout and provide peace of mind.
Budget
Now that you have a good handle on your space, it is time to think about your budget. While planning this, taking a quick look at our sets online will give you a good idea of how much a swing set costs. Also, you can request a price list from us, which will include the price of every item we offer. This allows you to get a very accurate estimate of how much your dream swing set will cost.
Don’t forget to factor in delivery and installation. You can find all of our delivery and installation prices here in this blog post.
Needs/Wants
Here is where the fun begins. Take a moment the next time you are at a public playground and observe what your child gravitates to. Do they like swinging? Do they spend a lot of time going up and down the slides? Do they use the equipment as a canvas for imaginative play and games? All of these answers and observations can help guide your design.
Now, let’s break down customizing into the individual swing set parts and discuss things you will need to consider when designing your own swing set.
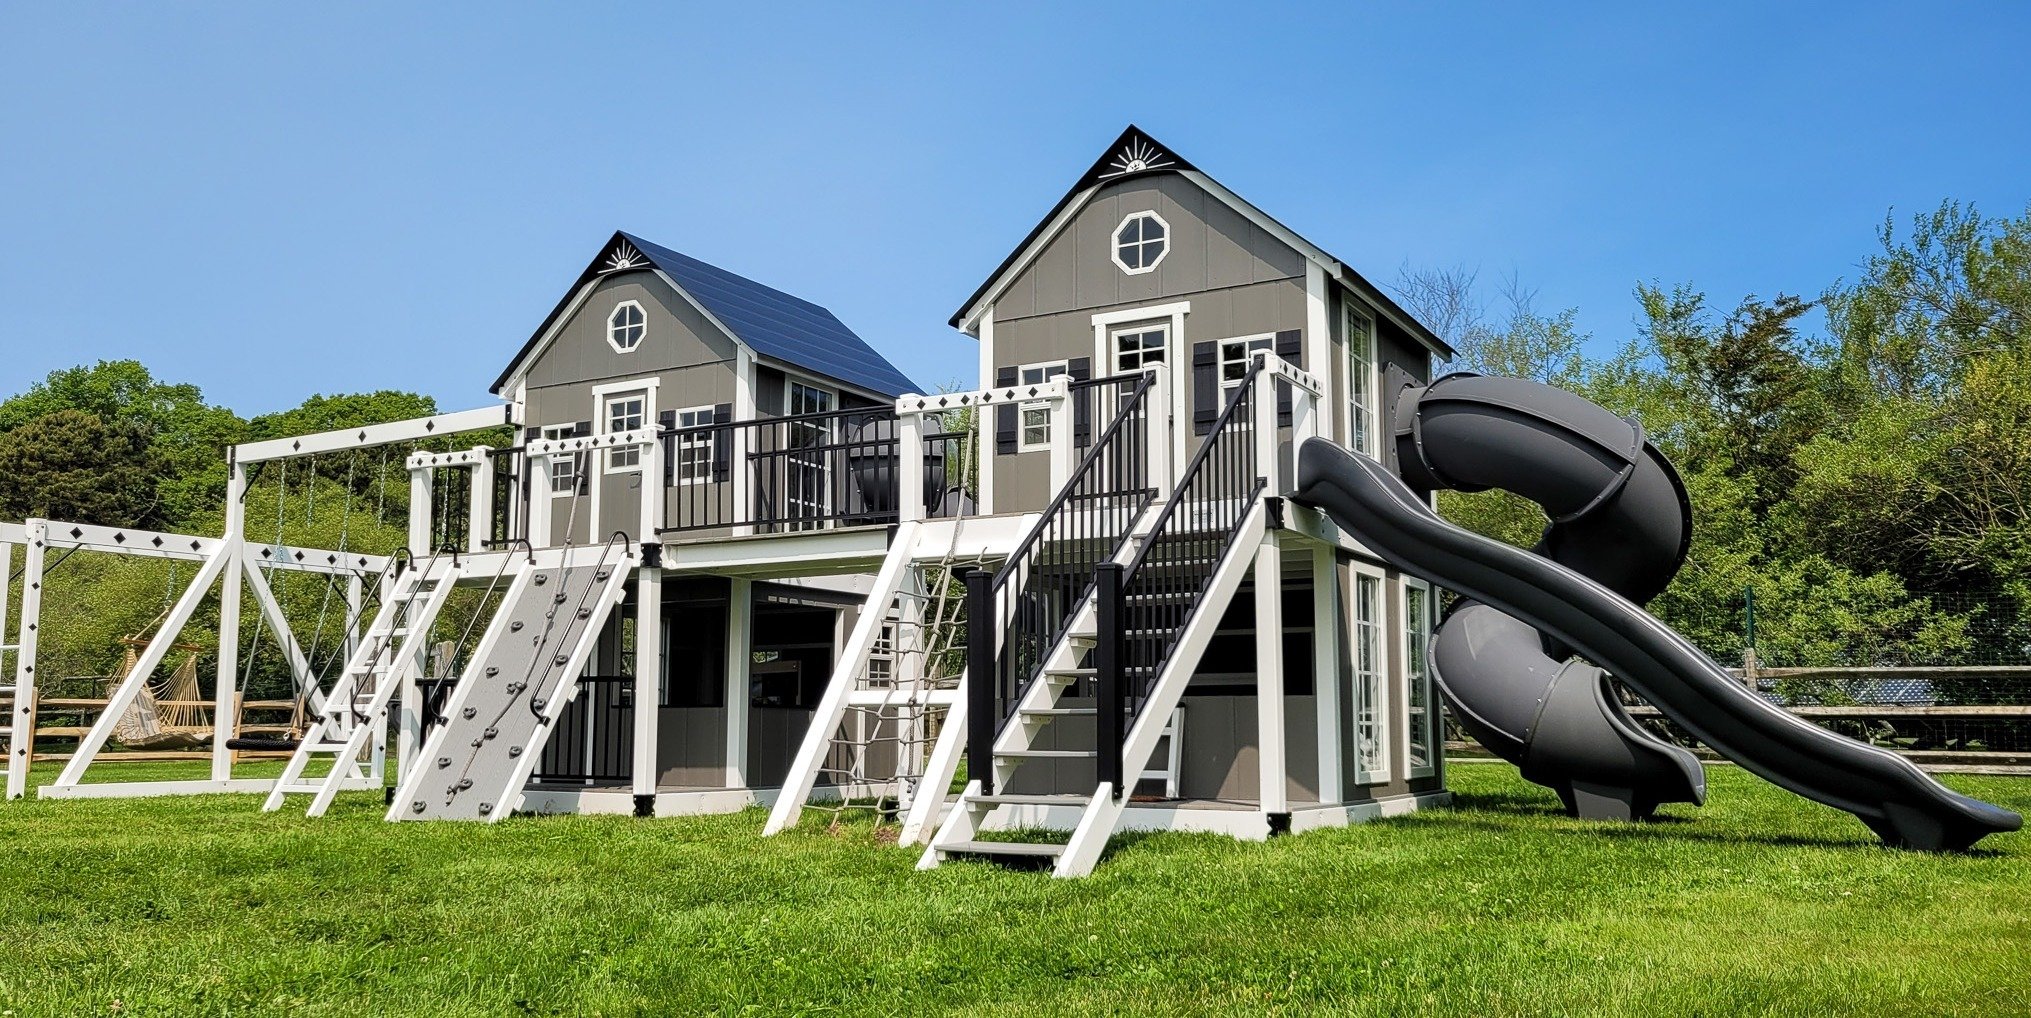
The Swing Set Tower

Your vinyl swing set is built around your tower. Whether a 2’x2’ or a massive 8’x11’, everything connects to the tower. Our standard height is 5’, but our towers can soar up to 9’. This is the place to start, and here are a few observations to help you.
- Taller towers are generally better for older children, but also work well for adventurous younger children, and then it will grow with your children. The taller climbers, faster slides, and higher swings keep the swing set fun as the kids grow.
- Space is critical. Lots of space allows creative play to take off since all the children can be in the tower at once.
- Think about your access points. Staircases and ramps take up more space than ladders but are much easier to use.
- The larger the tower, the more fun items we can safely attach to the tower.
- The height of your tower decides the height of your climbers. For example, a 7′ tall tower will get 7′ tall climbers. This is also true for slides, though there are some exceptions, as you will see.
We made a helpful video showing the different tower sizes, with my kids committing hardcore to their job. Check it out here.
Spend time looking at standard designs. For a wide range of deck sizes, check out the Cubby’s Fort’s 4’x4’, the Sea King’s 6’x8’, the Captain’s Castle’s 4’x8’ double deck, and the Launching Pad’s 6’x8’ double deck.
Playhouses

A playhouse provides an excellent place for imaginative play to grow.
All playhouses come with 5’ tall walls and functioning windows.
So, what can you customize on a playhouse?
- The Size: You can go from a 4’x6’ playhouse clear-up to a massive 8’x8’ playhouse. In general, the larger the playhouse, the higher the roof peaks. Also, the larger the playhouse, the larger the tower it sits on. The playhouse's size is determined by the tower on which it sits.
- The Roof: You have four roof options: 1: Poly Roof (as seen on the Lodge), 2: Metal (as seen on the Palace), 3: Lean-to (as seen on the Cottage), and 4: Sloped (as seen on the Hazel).
- Windows: You can replace our smaller windows with large windows or bubble tube panels. This allows for more natural light and allows you to see in at all times.
- Slides: The walls of your playhouse are very versatile, and we can attach our slides to the sides of the walls.
- Colors: We offer a wide range of colors. The best place to explore them is our color page.
When deciding how big you want the playhouse to be, consider how many children will routinely use it, whether you want to use it yourself, and what other items you want to place inside.
Roofs
Ok, now that you have decided on a tower alone or a tower with a playhouse, let’s cover roofs. Yes, I will make that pun every chance I get.
We made a whole video on this. You can view it here.
You have three options if you are getting a tower without a playhouse.
- Poly Roofs: Poly roofs have that classic play set look. They are made of interlocking boards. They span roofs 2’x2’ and up. See it in action on the Wave Rider.
- Plastic Roofs: Our plastic roof is a rotationally molded roof made right here in the USA. It is only available for 4’x4’ towers or balcony 4’x6’ towers. It is our best roof for 4’x4’ play decks. Check it out on the Cubby's Fort.
- Metal Roofs: Our metal roofs add style and durability. Explore it on the Frontier.
If you are getting a playhouse, you have four roof options.
- Poly Roofs: Poly roofs have that classic play set look. They are made of interlocking boards. They span playhouses that are 4’x6’ up to our biggest playhouse. This roof comes with a circular or octagonal window in the gable.
- Lean-to-Roof: This roof can be white or black, has metal roofing on top, and a horizontal window in the gable.
- A-Frame Roof: The A-frame roof can be either white or black.
- Metal Roofs: Our metal roofs add style and durability.
Here is an excellent place to talk about how waterproof our roofs are. Practically, none of our roofs are waterproof. Technically, the lean-to roof would shed water, but practically, water does get into the playhouses. The cost to make a waterproof playhouse would be exorbitant.
The A-frame and Metal roofs are waterproof.
Access Points: Ladders, Ramps, and Staircases

Now that you have picked out your tower and decided whether to get a playhouse, it is time to figure out what kind of playhouse and where to place your access points.
Here are some general guidelines/considerations.
Think about the flow of play: Don’t put an access point where children must run past swings or slides to get to it. For example, place a ramp between the slide and the swings so children can access it without dodging swings or children coming down the slide.
Ladders: Ladders are the most space-friendly and economical. However, they are the most difficult for older children and adults to use, as you must duck under the railing as you go up. Toddlers will have a difficult time with ladders.
Ramps: Ramps are the most simple access point and can have either rope or solid railings. I have observed younger children who are not steady on their feet be a little unsure of the rope railing. This will go away as they age, but if you are starting your family, getting the poly railings may be a smart investment. While accessible, our ramps do stick out 12’ from the tower. This makes them eat up a good bit of space in your yard. Ramps are not a good option for those who need to conserve space. Ramps are only available on 5’ tall towers.
Staircases: Staircases stand nicely between ladders and ramps. In my opinion, they are the best access point we offer. For a 5’ tower, they stick out 5’ from the tower, increasing by 1’ for each additional 1’ height of the tower. They can easily get up and down. 5′ staircases can have either poly or metal railings. 6′ and taller staircases must have poly railings or our new aluminum ones.The only flaw of the staircase is that you must put them under the roof’s peak. If you try to tuck stairs under the edge, taller children and adults will have to duck to avoid hitting their heads. This is also true for ramps, but ladders can be placed anywhere. The solution to this staircase problem is to raise the roof height to accommodate children going up and down.
I recommend the staircase if you intend to use the set or have taller children. It is friendly to adults and children of all ages and sizes.
Slides

We got fast slides, twirly slides, and straight slides. Let’s take each slide one at a time to discuss what they do well and what you need to know.
- Waterfall Slide: This is your tried-and-true classic design. These are economical and can be added side by side for slide races. They are fast and just an overall good slide. Their one downside is that they end abruptly, so sticking the landing can be a learning curve for small children. The waterfall slide is only available for 5’ towers.
- Avalanche Slide: A heavier-duty version of the waterfall. If you live in a hot climate, intend to use the set yourself, or have larger children, the avalanche slide is the better choice. It also has a safety lip at the bottom to help with a smooth landing. This slide can be on 5’ to 7’ tall towers.
- Super Spiral Slides: These slides are open, twirly slides. Younger children gravitate to them as they can see out all the way down. While older kids can use them, if they hit their growth spurt early, they may have to tuck in their legs as they come down. These slides can be on 3’ to 9’ tall towers.
- Turbo Tube Slides: This is the covered version of the super spiral. And yes, you do have to clear out spider webs once in a while, but in general, the turbo tube is faster than the super spiral and doesn’t have as sharp a turn, making it better for older kids.
- Tube Slides: Both the tunnel express slide and the sidewinder slide are fast slides. These will shoot you out like a Pez dispenser. Brave little ones will have a blast, but these slides work best for older kids.
- Ball Pit Blasts: A ball pit is fun, and so is a slide. But what about a slide that goes into a ball pit? Yes, we can do that! This is a very custom piece, though, and we have very exact measurements to abide by. The best move here is to talk to one of our sales team members.
All slides can be attached to a playhouse, though the tube slides work the best. This is because they have a flange that covers the entire slide entry. Slides like super spirals or avalanches must have an exit hole cut from the panel without covering. This does help add light and ventilation to the playhouse, but it sacrifices the cool factor.
Another neat trick with playhouses is attaching slides that are taller than the deck height. For example, the Cottage has a 5’ high tower, but you can attach a 7’ turbo tube to the sides or back. It is an excellent way of getting taller and faster slides without needing a taller tower.
If you want a more in-depth look at our different types of slides, check out this blog post. You can also watch this video!
Climbers: Rock Walls, Cargo Nets, and Combo Climbers

Rock walls and cargo nets can add a lot of fun to a vinyl swing set and help spark creativity and build strength, coordination, and confidence. Here are a few things to help you customize a swing set.
- Full-Width VS Combos: Full-width climbers are better for climbing, but combos (such as a rock wall/ladder combo) are more economical. If you are going with a climber that is 6’ or taller, I would highly recommend full-width climbers, as it is such a better climbing experience.
- Cargo nets: Cargo nets are a great climbing alternative. One benefit of a cargo net that is often missed is that you can see through them, helping your playset feel more spacious and allowing you to see your kids at all times. The cargo net doesn’t resist fading as well as the rock wall.
- Half-Width Climbers: If you have a small space left and really want a climber, you can do a half-width climber.
In general, there are not a lot of unique or special things you can do with climbers. They attach to the towers and provide lots of fun but are not super flashy.
Here is a helpful video on our climbers:
Bridges/Connectors
Nothing attracts kids to a playground like a wobbly bridge. Swing sets or play sets that have bridges have an extra layer of epic. Here are a few things you need to know about bridges/connectors.
- Wobbly Bridge Heights: If young children use the set, do not go higher than 5’ for a wobbly bridge. This can be scary for little children.
- Solid Bridges: Solid bridges are very versatile as they can be a wide range of lengths. They can have slides, climbers, and fun accessories attached to them. You have to make sure your solid bridges connect to each tower under the roof’s peak to avoid having a head-bonking situation. Also, you can hang swings under a bridge as well, though, for best results, it should be at least 6’ tall. Anything shorter makes for stubby swings.
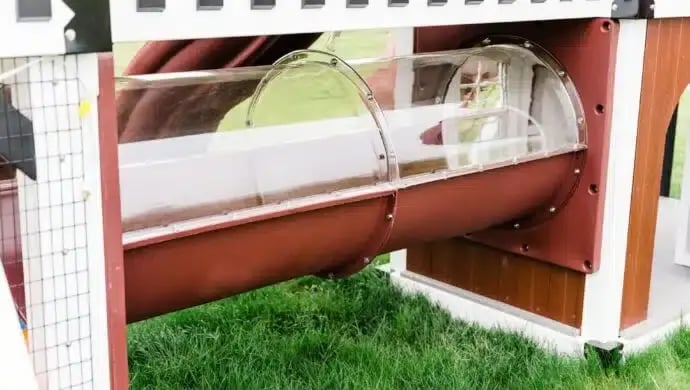
- Tube Connectors: Tube connectors can have a clear or solid top. Three is the max we can attach together.
- Flat Ground: Swing sets with bridges tend to be very long, thus making them more sensitive to any slope in the yard. The flatter your yard, the better the result. If you have a really nasty slope, we may have to slant a bridge to get it to connect properly.
Bridges are a great addition to your vinyl swing set. They are very versatile and can do many things, so go wild!
Under the Tower

Now that you have big set pieces planned on your vinyl swing set let’s talk about what can go under your playset tower. With sets like the Homestead having incredible clubhouses under the tower, the options are getting more and more epic. Here are a few to consider.
- Clubhouse: We can enclose the bottom of the swing set tower to make a clubhouse. For towers that are 5’ tall, the headspace inside the clubhouse is about 4’ once you consider flooring and the rafters overhead. Generally, the taller the tower, the more spacious the clubhouse feels. Clubhouses can have all sorts of things inside them. We have seen ball pits, coffee bars, half walls, lemonade stands, big windows, and doors. It is an excellent space for creative play, as it is ground-level and accessible from all sides.
- Ball Pit: A ball pit is a fantastic addition to a swing set. They all come with Trex flooring and with plenty of balls. We get asked all the time if the ball pits get gross, and the simple answer is no. Since it has a floor and the balls are round, air can pass through the entire pit, quickly drying it after rain.
- Decking: Adding Trex decking under the tower creates a great place to store outdoor toys and complements our coffee bar, lemonade stand, and play kitchen. Be mindful that the decking will ultimately impact the growth of grass underneath.
- Lemonade Stand and Coffee Bar: The Lemonade stand can be as wide as your tower and has a serving bar extending from the tower. The coffee bar is L-shaped and can be built with or without the surrounding clubhouse walls. The coffee bar does require Playhouse walls under it. The serving bar extends inward. Both of these are so cute and add great value to the bottom of your tower.
- Picnic Table: You can have a picnic table built in or loose under the tower. If it is loose, it is part of the structure. If you choose a loose picnic table, it can slide in and out from under the tower. This can be nice if you want to move it around the yard.
- Checkerboard Sandbox Cover: While we don’t include sand, you can use the bottom frame of your tower as a sandbox. If you have a 4’x4’ or 4’x6’ base, you can get our solid checkerboard sandbox cover to keep cats and debris at bay.
We have seen an uptick in our customers really maxing out the bottom of their play sets. With so many cute and fun options, it is a great way to double the fun without increasing your footprint in your yard.
Fun Accessories
Now it is time to fill any remaining space with fun accessories.
While we have far too many to cover here, let me highlight a few. You can view all the options here.
- Play Kitchen: Brand new for 2026, designed and manufactured exclusively by King Swings, our Indoor-Outdoor Play Kitchen is built from the same durable, weather-resistant materials trusted across our swing sets. Created for real-world play, the kitchen features realistic elements—including a sink, oven, and refrigerator—so children can mimic everyday moments through imaginative play. It’s designed to integrate seamlessly into many King Swings playhouses or to stand alone as a standalone feature on a patio, deck, or backyard play area.
- Fireman’s Pole: The fireman’s pole is one of our most popular accessories because it adds a completely different play experience without requiring additional space. It gives kids a fast, fun way to get down from a deck or tower while increasing the structure's overall play value.
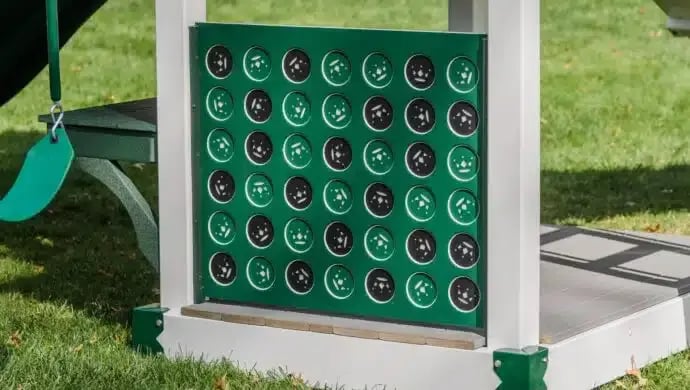
- Connect-Four-In-A-Row Game: Another great item, this can be used in place of railing on a 4’x4’ tower or added below the tower. It is a great game and adds a lot of color to your swing set.
- Ship’s Wheel: The ship’s wheel can transform your child into an admiral at sea, a pilot in his plane, or an astronaut zooming into space. It is versatile and fun to use!
Whether you add one or all of them, fun accessories are a great way to bring color and playful elements to the set.
Conclusion
Every King Swings set is built specifically for the family who ordered it, giving you the flexibility to create a design that fits your backyard, your children, and your style. Whether you're making a few adjustments or designing something completely custom, our Design Consultants will guide you through the process at no additional cost. Together, we'll create a backyard destination your family can enjoy for years to come.

Dad to three kids, Justin knows how important it is for children to get lots of physical exercise. His time as a school teacher reinforced that idea. He is passionate about creating fun, enjoyable playgrounds that are safe but full of learning opportunities.
Read More Justin Doutrich